


Written October, 2006 by me (Kris)
Any similarity of any others on the web is a pure coincidence.
Please do NOT take my tutorial and claim it as your own.
If you would like to share this tutorial with friends,
Then by all means send them to my blog!
~ Any settings that aren’t shown are default ~
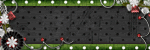
~ What we’ll make ~

~ What we’ll need ~
Any similarity of any others on the web is a pure coincidence.
Please do NOT take my tutorial and claim it as your own.
If you would like to share this tutorial with friends,
Then by all means send them to my blog!
~ Any settings that aren’t shown are default ~
~ What we’ll make ~

~ What we’ll need ~
PSP (I used 8)
EyeCandy 4000 (optional)
Tube: Candy Corn
Right click and save this one or use a tube of your own…

Mura’s Meister – Copies Filter – Download HERE
(Need help installing the filter? Then go to my tut HERE)
A mask of choice
(I’m used mask 187)
~this was already in the program~
Font of choice
(I used CK Pitch)
~ Let’s Begin! ~
1.
Open PSP; open your candy corn or tube of choice
File/Export/Picture Tube
Enter the name of the tube file.
2.
Now you’ll want to open 2 new images
File>New>400 x 250 pixels, transparent
3.
Grab your tube tool
Put a bunch of candy corn onto one of your images
I put 12 onto mine, put as many as you wish…
4.
Now, you’ll want to go to;
Effects/Plug-In/Mura’s Meister/Copies
Settings:
Random
Tile
Behind
All the rest are default settings J
Minimize this for now… J
5.
Go to your next image;
Grab your text tool
Choose a dark color from the corn for the foreground.
Set your background to patterns
And find the candy corn image we made earlier.
In your Text Tool Options;
Settings:
Create As: Vector
Size: 90
(Depending on size of text)
Stroke Width: 2
Type your text and hit apply.
6.
Selections/ Modify/ Contract by 1
Effects/ Plugins/ EyeCandy 4000
Settings:
11.81
75
Inside Marquee
3
0
30
0
30
Click ok
Deselect (CTRL D)
7.
Effects/ 3D Effects/ Drop Shadow
Settings:
V & H: 2
Opacity: 50
Blur: 4.95
Color: Black
Click Ok
Now back to your candy corn image. J
8.
Adjust/Gaussian Blur:
Radius: 8
9.
Layers – Load/Save Mask
Load Mask from Disk…
A box will pop up
Mask: Choose one of your choice
Create Mask From: Source Luminance - checked
Orientation: Fit To Layer - checked
Options: Invert Transparency - unchecked, Hide all Masks – checked
Click Load
Layers/Merge/Merge Group J
10.
Copy this image
Go back to your text image
Paste as a new layer
Now go to Layers/Arrange/Send to bottom
Set the opacity on this layer to 60%
Now Layers/ Merge Visible
11.
Grab your tube tool again
Put some candy corn on your image around your name
Putting each one on a new layer, so that you can move them around if need be
Once you’re happy go to Layers/Merge/Merge Visible
Add a new raster layer and add your water mark at this time.
Layers/ Merge/Merge All Flatten
Save as & you’re done!
Here's another I've made:

Thanks for trying my tutorial.
I hope you’ve enjoyed trying and have learned something.


1 comment:
Kris, you have an award in my blog!
http://coquettasdesignz.blogspot.com/
Post a Comment