Click Image to Preview
Monday, March 15, 2010
Dabbling a little
Click Image to Preview
Tuesday, July 29, 2008
Creating a Watermark
This tutorial is written in psp 8, but can be done in earlier versions or the latest version.
~What you’ll need~
PSP
Font of choice
Basic Knowledge of psp, lol
And patience with me, lol!
~Let’s Begin!~
1.
Open a new image 200 x 200 pixels.
Grab your text tool
Font of choice, size 14 or 18, depending on font and size of your name
Tool Options Settings~ create as: selection, stroke width: 0, Anti-Alias checked.
Type your name or whatever you want your watermark to be.
Click Apply.
2.
Effects>3D Effects>Drop Shadow
Settings:
Vertical & Horizontal= 2
Opacity= 90
Blur= 5
Color: Black
(unless you have a black background then use a light color of choice)
Repeat step 2,
Selections – Select None (CTRL D)
3.
Grab your crop tool and select the merged opaque,
File>Export> Picture Tube-
type in the name you want it to be
And you’re done!
Here’s another I made for a friend to use on some pictures…
Installing tubes into PSP
Written April 17, 2007 by Kris
This is my own tutorial and how I install tubes into PSP. Please do not take and copy my tutorial and claim it to be your own. If you’d like to share it with a friend, then by all means please link your friend to my blogspot. Thanks!
Now you must already have some PSP tubes saved on your pc. They must be tubes that are safe tubes. Try to get familiar with safe tubes and non safe tubes. Here is a site for you to go check out safe tubes… Artists That Allow
I myself have a PSP folder in my My Documents titled PSP Stuff with subfolders each titled with what I’m going to put in them. Fonts, Plug-Ins, Tubes, etc. I never install my tubes directly into the PSP Folder like directed in most tutorials.
*NOTE* You don’t need to export or install all tubes you find… some are way too big to place there and will cause PSP to crash.
If I want to use a tube I normally just open it in PSP and use it that way, but if I want it installed. This is what I do.
I go to File/Export/Picture Tube
You’ll have a window pop up
Where it says Tube Name type in the name of the picture or tube that you have opened. Click ok.
NOTE: Keep all file names intact for ALL tubes that you may download, do NOT change any file names!
Now to use the tube you just exported.
Open a new image 400 x 400 transparent.
Now look in your tools off to the left and find your tube tool
In the tools options – this will show up to the top of your PSP
Find the tube you just exported
Go over to your image that you opened and click once on it.
Now you have your tube to work with.
NOTE: you may need to change the size of it in the tool options in order to use it.
Have fun! I hope you’ve learned something from me!
Wednesday, July 2, 2008
Tools - Beginner
Tools – Basic PSP Tut
This is my tutorial any similarities is pure coincidence.
I’m giving this brief tutorial for newbies just learning how to do things with PSP.
~Please Do NOT claim this tut as your own.~
This is written in PSP 8 you should get a general idea of PSP all together. Other versions may be a little different.
Here you will find basic meanings of tools and other things you’ll find throughout PSP.
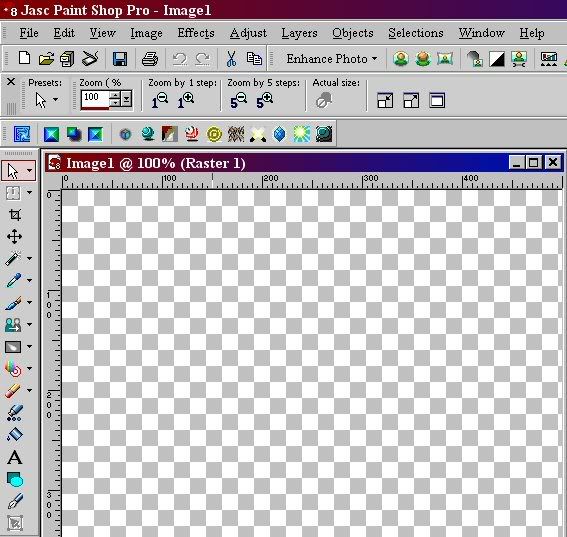
Now before I start with the meanings of each tool, we need to open our tools up so we can find them easily each time around.
Go to View>Toolbars>Tools this will open your tools up off to the side.
[NOTE: In higher versions like psp 9, 10, 11 & 12,
you won't need to open up your tools, but for psp 7 & 8 you do.]
Click below to see a preview of what the toolbar and tools look like.
PREVIEW
Airbrush Tool ~
This is used for painting effects.
Clone Tool ~
With this tool you can take an area of an object and paint it into a different area.
Color Replacer Tool ~
Use this to change the color on an image.
Crop Tool ~
To crop the image ~ Cut away some of it.
Deform Tool ~
Use this to change shape/size or direction of a tube or text. This causes loss of clarity so sharpen your image after you’re done. Do this by going to Adjust>Sharpness>Sharpen.
Dropper Tool ~
Use this to select a color from an image to use in text or background or border.
Eraser Tool ~
Use this to erase parts of an image.
Flood Fill Tool ~
Use this to flood fill your beginning image for your background or to flood fill text, etc.
Freehand Tool ~
This is known as the lasso, it allows you to select an area of any shape or size by hand.
Magic Wand Tool ~
Allows you to select parts of an image or text to add effects
Mover Tool ~
Allows you to move an image or text to where you want it.
Pan Tool ~
Use this tool when copying and pasting images, etc.
Paint Brush Tool ~
Use this to paint. Or you can use it to create different effects with the various brushes available.
Preset Shape Tool ~
Used to make shapes of all sizes
Selection Tool ~
Select an area by shape.
Target Brush Tool ~
Use this to target part of an image and change the color.
Text Tool ~
Allows you to put a text to an image
Tube Tool ~
Allows you to add images to your workspace
Zoom Tool ~
Allows you to zoom in on an image.
Thanks for trying my tut. I hope I made it understandable enough.
If you have any questions about anything, email me.
I hope you enjoyed reading this.
Toolbars - Beginner
Toolbars
This tutorial was written in PSP 8. But it might be different in other versions. Just go to your Help Topics to learn about any other new tools and the way they work. To get to your help topics just go up to Help/Help Topics and click on Index Tab, type in toolbars, double click on toolbars and a little window will pop up double click on Using Toolbars.
I will put the path to get each toolbar open then I will explain each one. You may not need each one open in the future, but this will at least tell you know how they work.
Ok, let’s get started!
Go View/toolbars/standard
Standard Toolbar ~ displays the most common commands, such as saving images, undoing a command, and cutting items. Paint Shop Pro automatically displays this toolbar when you first run the program.
Go View/toolbars/tools
Tools Toolbar ~ Crop, paint, draw, type, and perform other image editing tasks.
Go View/toolbars/browser
Browser Toolbar ~ displays commands for using the Paint Shop Pro browser.
Go View/toolbars/effects
Effects Toolbar ~ displays commands for applying effects to your images.
Go View/toolbars/photo
Photo Toolbar ~ displays commands for enhancing photos.
Go View/toolbars/script
Script Toolbar ~ displays commands for creating and running scripts.
Go View/toolbars/web
Web Toolbar ~ displays commands for creating and saving images for the Web.
That's all there is to it for learning about the tools...