My Button!

Please feel free to grab my button!
Photobucket
Showing posts with label Beginners. Show all posts

Tuesday, July 29, 2008

Creating a Watermark

How to create a watermark

This tutorial is written in psp 8, but can be done in earlier versions or the latest version.
~Here's what we'll make~


Photobucket

~What you’ll need~

PSP
Font of choice
Basic Knowledge of psp, lol
And patience with me, lol!

~Let’s Begin!~

1.
Open a new image 200 x 200 pixels.

Grab your text tool

Font of choice, size 14 or 18, depending on font and size of your name
Tool Options Settings~ create as: selection, stroke width: 0, Anti-Alias checked.

Type your name or whatever you want your watermark to be.
Click Apply.

2.
Effects>3D Effects>Drop Shadow
Settings:
Vertical & Horizontal= 2
Opacity= 90
Blur= 5
Color: Black
(unless you have a black background then use a light color of choice)

Repeat step 2,
except change Vertical & Horizontal to -2

Selections – Select None (CTRL D)

3.
Grab your crop tool and select the merged opaque,
you’ll find this in your tools options at the top and to the far right…
click the check mark, which is also in your tools options and to the far left.
4.
File>Export> Picture Tube-
type in the name you want it to be

And you’re done!
Now you have a watermark to use for all your projects
or pictures you’ve taken and want to share.

Here’s another I made for a friend to use on some pictures…


Photobucket

Thanks for trying my tutorial, I hope you have learned something from me today!
Feel free to email me with any questions you might have!

Installing Plug-ins/Filters into PSP

Are you new to PSP? Are you just learning the basics so far and are wondering what Plug-ins/Filters are?
Well I hope this will help answer your questions!


Installing Plug-ins/Filters into PSP

This is my own version of installing PSP,
The way I find easy to put them into my PSP
Without having my PSP crash all the time.

Different tutorials you might need a plug in for they usually have a link to download a plug – in and expect you to know how to use it right, well these steps will hopefully help you understand how to install plug-ins any time you need to.

There are lots of free Plug-Ins and a lot of PTU (Pay To Use) Plug-Ins out there.
You will find lots of them will say photoshop plugin or filter… but you can also use them in PSP.

Before installing your plug-ins you’ll probably need some Plug-in DLL Files.

These are the 3 different ones that PSP Plug-Ins require

Msvcrt10.dll
icmfilter.dll. – find this one about ½ way down the page

Some plug-ins may need converted, so you may need to download
Plug-In Commander

You will have to install them this way for the version of PC you have as follows. They will have to go into each of the folders listed there.Windows 98 - C:\Windows\SystemWindows ME - put the Plugin.dll into C:\Windows and into your plugins folder. Put the Msvcrt10.dll into your C:\Windows\SystemWindows 2000 - C:\WINNT\System32Windows XP - C:\Windows\System32

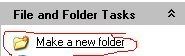
Go to your My Computer and make a new folder
Like so… Click the link below to see the preview…

PREVIEW


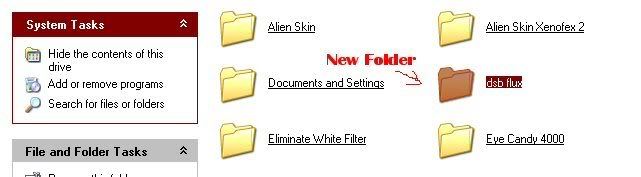
and name it to whatever name the Plug-in is. Like say you need to install DSB Flux, you would name the folder DSB Flux.

This is what you should have…

PREVIEW

Un-zip the plug in into the folder you made in you’re My Computer.

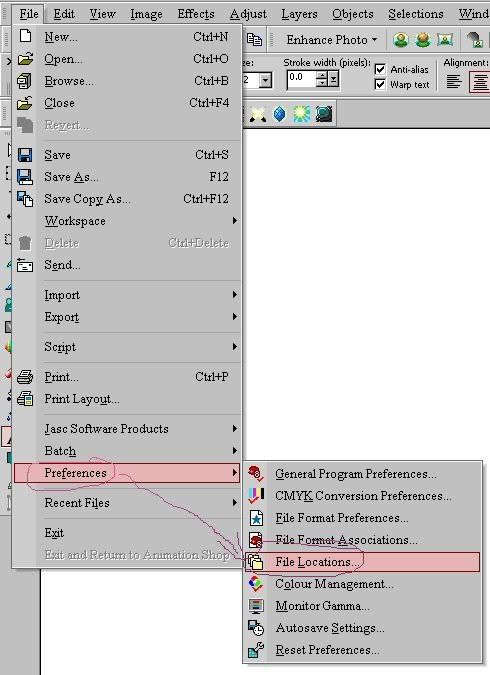
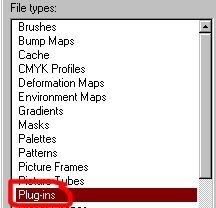
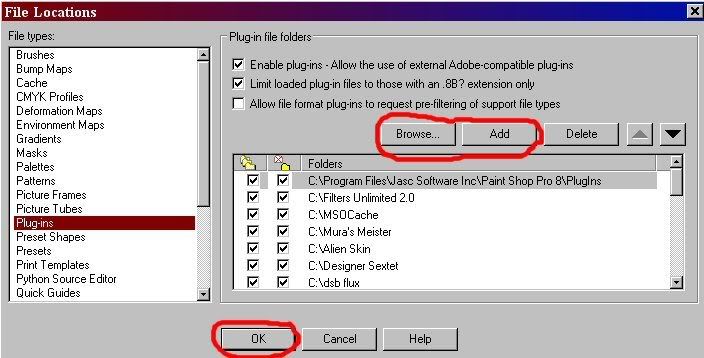
Open up your PSP, go to File/Preferences/File Locations,

PREVIEW

you will have a window pop up in that window look off to the left and you’ll see a list of things, find Plug-in and click on it.

PREVIEW

Click Add, then click Browse and find the Plug-In that you just Un-zipped into your folder in My Computer. Click Ok.

Like so…

PREVIEW

Now you want to close PSP out and then re-open it.

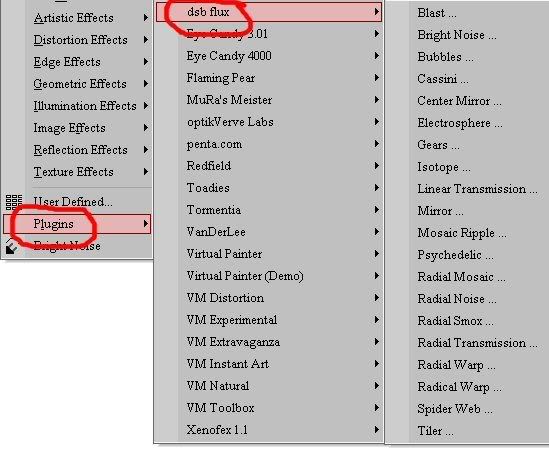
Open a new canvas and go to your Effects/Plug-ins and you should find the one you just installed.

Like so…

PREVIEW

Now you can make all sorts of things using any Plug-in that you install to PSP.
Hope this helps you to understand PSP even better.

Palettes - Beginners

Are you a beginner with psp? Well this will be a great tutorial for you to start with. If you've done my previous tutorials "Toolbars - Beginner" & "Tools - Beginners" then this will be somewhat easier for you as you should know how to get around psp a bit better.

Palettes

This tutorial is written using PSP 8; each version may be a bit different though.


If you’re new to PSP, you can search in the Help Topics of your PSP version.

Before starting this tutorial we need to get our palettes opened up for easy access for each use in PSP. You won’t need all of the palettes open for everything all the time, but I will tell you where to find each one and get them open and tell you the use of each.

Go to View/Palettes/Materials

Materials palette ~ Select colors and materials for painting, drawing, filling, and retouching.

Go View/Palettes/Tool Options

Tool Options ~ Modify options for the currently selected tool.

Go View/Palettes/Layers

Layers Palette ~ View, organize, and edit image layers.

Go View/Palettes/Learning Center

Learning Center Palette ~ displays tutorials for common tasks.

Go View/Palettes/Histogram

Histogram Palette ~ displays a graph of the distribution of red, green, blue, grayscale, hue, saturation, and lightness values in an image. Analyze the distribution of detail in the shadows, midtones, and highlights to decide how to make corrections.

Go View/Palettes/Overview

Overview Palette ~ displays a thumbnail view of the active image, as well as information about the image.

Go View/Palettes/Script Output

Script Output Palette ~ displays actions you take and the results of running scripts.

Go View/Palettes/Brush Variance

Brush Variance Palette ~ Sets additional brush options. This palette is particularly useful if you have a 4D mouse or a pressure-sensitive tablet. For example, you can vary the opacity of a brush stroke by applying pressure with the stylus. You can use some options with a mouse.