

Written September 7, 2006 by me (Kris)
Any similarity with others is a pure coincidence.
Any similarity with others is a pure coincidence.
Please do NOT take this tutorial and claim as your own.
If you would like to share this tutorial with friends,
then by all means send them to my blog!
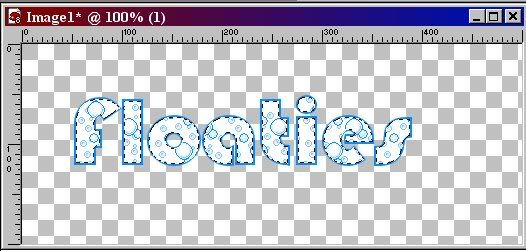
~What We’ll Make~
~What We’ll Make~

~ What We’ll Need ~
PSP (Any Version)
Basic Knowledge of PSP
Font of Choice (I’m using Bauhauss 93)
Floatie of choice
(you can do a google search for one or right click and save this one)

~Settings that are NOT shown in this tutorial are default settings~
~Floaties~

~Settings that are NOT shown in this tutorial are default settings~
~Floaties~
1.
Open up A/S (Animation Shop)
Open up A/S (Animation Shop)
and open up the floatie you saved
Make frame 1 active and Copy (CTRL C)
Go Back to PSP and Paste (CTRL V)
Do this with each frame
Now that you have done this,
Make frame 1 active and Copy (CTRL C)
Go Back to PSP and Paste (CTRL V)
Do this with each frame
Now that you have done this,
each of them will show up in the patterns
(you'll find this in your color palette).
~ Text ~
~ Text ~
2.
Open a new image in PSP 500 x 200 pixels
Open a new image in PSP 500 x 200 pixels
or larger depending on size of your name.
Grab the text tool
Settings below:
Create As: Floating
Grab the text tool
Settings below:
Create As: Floating
Size: 72 depending on size of text
Stroke:2
Bold
3.
Make your foreground #088CFF
Make your foreground #088CFF
and your background #FFFFFF
or you can make them to go with your floaties.
Type your text and apply.
Type your text and apply.
4.
Selections> Modify> Contract set at 2
Make your text active
Selections> Modify> Contract set at 2
Make your text active
(clicking on it in the Layer Palette)
Layers>Duplicate
Layers>Duplicate
Duplicate your text to make as many layers as you have of frames for the floaties.
I have 10 floatie frames, so I’ll make 9 layers for my text to make 10 layers.
This is what it should look like if you have 10 layers. I renamed each layer so you could see.
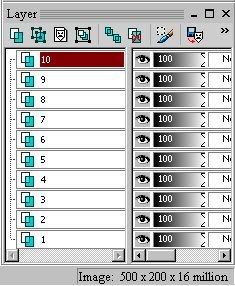
This is what it should look like if you have 10 layers. I renamed each layer so you could see.

Go to your text layer 1 make it active.
Grab your flood fill tool and set the match mode to none.
X out all your layers except for layer 1
This is what it should look like:

Now back to your Floaties
Open your Patterns

Find your first floatie
Go to your text and flood fill your first text.
This is what you should have.
X out this layer and make your layer 2 active and take the X off.
Go to the patterns grab your next floatie
Flood fill your text again.
X out this layer and make your layer 3 active and take the X off.
Go to the patterns grab your next floatie
Flood fill text again.
Do this till you have all your text layers filled.
Un-X all the layers once you’re done.
Deselect (CTRL D)
Grab your crop tool. Click on the Merged Opaque
Save as a psp image.
Go back to A/S and open your image.
Animations> View Animation
If it looks good.
Let’s work on your optimization if you haven’t got it done.
If it’s a little jumpy you may need to go back to psp
If it’s a little jumpy you may need to go back to psp
and go back over your steps again till it looks right.
File>Optimization Wizard,
File>Optimization Wizard,
click next>Customize>Partial Transparency,
click on Yes, blend with this colour,
make it white or whatever a tut tells you to make it.
Save as, type in a file name and click save and you’re done!
Thanks for trying my tutorial.
I hope you’ve enjoyed trying and have learned something.
Feel free to email me with any questions you might have!
Save as, type in a file name and click save and you’re done!
Thanks for trying my tutorial.
I hope you’ve enjoyed trying and have learned something.
Feel free to email me with any questions you might have!


No comments:
Post a Comment