

How to put a mask to a picture
This tutorial was written in PSP 8
My tutorials require knowledge of PSP
They also require patience with me, lol.
~Supplies Needed~
PSP (Any version will work)
A nice sized photo to work with
Font of choice
~ Let’s Begin! ~
1.
Open up PSP open an original sized photo
Duplicate (shift D) the photo
Grab your crop tool crop a little of your photo
Resize it to 250 x 250 pixels, no bigger than 300, it’ll shrink quite a bit to where it’s too small, go to View>Zoom>Zoom in by 1 step. Do this until it gets to 100%.
2.
Opening up your mask-
Go to Layers - Load - Save Mask
Choose a mask that you like.
Settings…
Create mask from - source luminance
Orientation - Fit to Layer
Options - uncheck invert transparency (depends on the mask)
Click Load
Layers>Merge>Merge Group
3.
Text (optional)
Grab your text tool
Font Settings:
Create As: Vector
Font: Font of choice
Size: Size of choice, depends on the size of text you’ll add.
Colors from Color Materials:
Choose a nice dark shade for the foreground/stroke
Choose a nice light shade for the background/fill
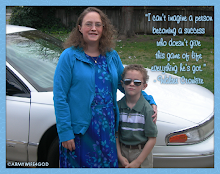
Click on the image, type your text and apply.
4.
Apply a drop shadow if you wish.
Effects>3D Effects>Drop Shadow
My Settings:
V=1, H= 1, Opacity= 58, Blur= 4
Merge Visible or Merge All Flatten
Save As a PNG or JPEG
Thanks for trying my tutorial.
I hope you’ve enjoyed trying and have learned something.
Feel free to email me with any questions you might have!
This tutorial was written in PSP 8
My tutorials require knowledge of PSP
They also require patience with me, lol.
~Supplies Needed~
PSP (Any version will work)
A nice sized photo to work with
Font of choice
~ Let’s Begin! ~
1.
Open up PSP open an original sized photo
Duplicate (shift D) the photo
Grab your crop tool crop a little of your photo
Resize it to 250 x 250 pixels, no bigger than 300, it’ll shrink quite a bit to where it’s too small, go to View>Zoom>Zoom in by 1 step. Do this until it gets to 100%.
2.
Opening up your mask-
Go to Layers - Load - Save Mask
Choose a mask that you like.
Settings…
Create mask from - source luminance
Orientation - Fit to Layer
Options - uncheck invert transparency (depends on the mask)
Click Load
Layers>Merge>Merge Group
3.
Text (optional)
Grab your text tool
Font Settings:
Create As: Vector
Font: Font of choice
Size: Size of choice, depends on the size of text you’ll add.
Colors from Color Materials:
Choose a nice dark shade for the foreground/stroke
Choose a nice light shade for the background/fill
Click on the image, type your text and apply.
4.
Apply a drop shadow if you wish.
Effects>3D Effects>Drop Shadow
My Settings:
V=1, H= 1, Opacity= 58, Blur= 4
Merge Visible or Merge All Flatten
Save As a PNG or JPEG
Thanks for trying my tutorial.
I hope you’ve enjoyed trying and have learned something.
Feel free to email me with any questions you might have!


No comments:
Post a Comment